Building a Custom Deck: From Planning to Finishing Touches
Building your custom deck starts by evaluating your needs, whether for quiet dinners or large gatherings, focusing on durability and safety. You’ll need to sketch a design that enhances flow from house to deck, choose materials that balance aesthetics with maintenance like teak or composite, and secure the necessary permits. Properly prepare your site by clearing and leveling, and construct a robust framework to support your deck. Add functionality and style with features like built-in seating and lighting, and don’t forget regular maintenance to guarantee longevity. Embrace these steps, and you’ll see how your dream deck transforms your outdoor living space.
Assessing Your Needs
Before diving into construction, it’s important to assess your needs for a custom deck. You’ll need to contemplate how you plan to use this space. Is it for quiet family dinners, or do you envision large gatherings? Understanding its purpose guides the size and features you’ll require.
Safety is paramount. Ponder the materials: Are they durable and slip-resistant? You don’t want to compromise on quality, especially when it pertains to the safety of your loved ones. Think about the placement too. It should provide easy access and not pose any hazards.
Accessibility is another critical factor. If you or a family member has mobility issues, incorporating features like ramps instead of stairs, and wide pathways, can make a big difference.
Lastly, reflect on the maintenance aspect. Some materials require more upkeep than others. Opting for low-maintenance options might be preferable if you’re not keen on frequent staining or repairs.
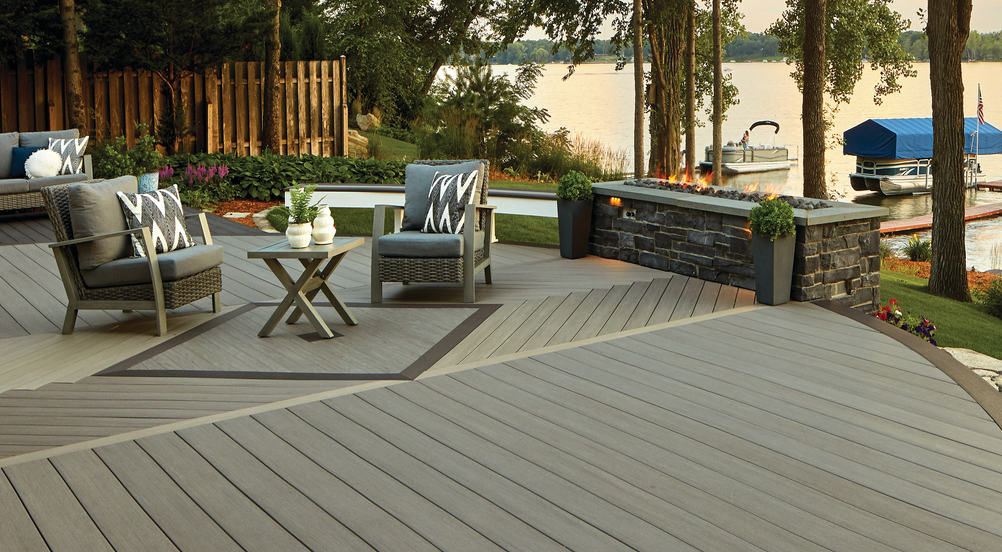
Designing Your Deck
Why not transform your outdoor space into a personalized retreat? Designing your deck is your chance to create a safe, functional, and aesthetically pleasing extension of your home. Start by sketching a basic layout. Consider how you’ll use the space—whether for quiet morning coffees or lively weekend barbecues—and plan accordingly.
Focus on safety and accessibility. Incorporate wide walkways and gentle, well-lit steps to accommodate everyone, from kids to seniors. Railings are not just a safety feature; they can also be a design element. Choose a style that complements your home and enhances security.
Think about the flow from your house to the deck. Ideally, you want it to feel like a natural extension, not an afterthought. Position doors and stairs thoughtfully to guarantee a seamless passage. Don’t forget to plan for the elements. A pergola or canopy can provide shade on sunny days, while a built-in windbreak can protect from chilly breezes.
Choosing Materials
Once your deck design is finalized, it’s important to select the right materials that will guarantee durability and enhance the beauty of your outdoor space. You’ll want to take into account both the functionality and the aesthetic appeal of the materials you choose, ensuring they’ll stand up to the weather and wear over time.
Wood is a popular choice for its natural look and warmth. However, it requires regular maintenance to prevent decay and damage. Hardwoods like teak or cedar are durable and resistant to rot, making them safer and long-lasting. Alternatively, composite materials offer a low-maintenance solution with high resistance to mold, fading, and staining. They’re also safer for families as they don’t splinter and are slip-resistant.
When selecting materials, it’s essential to reflect on the safety features they offer. Opt for materials that are fire-resistant and have good traction, especially if you’re in an area prone to wet weather. Safety doesn’t just mean the ability to resist wear; it also encompasses ensuring that the surface is safe to walk on under all conditions.
Choosing the right materials isn’t just about aesthetics; it’s about creating a safe, enduring outdoor living space that you’ll enjoy for years to come.
Securing Permits
After selecting your materials, securing the necessary permits is your next vital step. Don’t overlook this phase; it’s essential for guaranteeing your deck is built legally and safely. Start by contacting your local building department. They’ll provide the specific requirements and applications needed for a residential deck.
Each municipality has different rules, so it’s important you’re aware of these nuances. Typically, you’ll need to submit detailed plans of your deck design, including dimensions and materials. These plans help officials verify that your structure will be safe and compliant with local building codes.
Preparing the Site
With your permits secured, the next step is preparing the site for your new deck. It’s vital to start with a clean, clear area to guarantee safety and accuracy throughout the build. First, remove any debris, rocks, and vegetation where the deck will sit. This isn’t just about aesthetics; it’s about creating a stable base and preventing future issues with growth and pests.
Next, level the ground. Uneven terrain can lead to structural problems down the line, so take your time to properly grade the site. Use a transit or a laser level to check the flatness. If you’re unsure how to do this, consider hiring a professional to make sure it’s done correctly.
It’s also essential to mark out the exact dimensions of your deck using stakes and string. This outline guides you during construction and helps in visualizing the space. Double-check these measurements against your design plans to avoid any surprises later.
Lastly, assess the drainage around your deck area. Proper drainage is critical to prevent water accumulation that could damage the wood. Install a suitable drainage system if necessary. By taking these precautions, you’re setting the stage for a successful and safe deck construction.
Constructing the Framework
Moving into constructing the framework, you’ll begin by setting the foundation posts, which are essential for a stable and enduring deck. You want to guarantee these posts are anchored securely to prevent any movement over time. Digging the post holes to the proper depth—below the frost line—and filling them with concrete will provide a solid base. It’s not just about durability; it’s also about your safety and the longevity of your deck.
Here’s a quick reference table to guide you:
| Step | Key Point |
|---|---|
| Set Foundation | Anchor posts below frost line |
| Attach Beams | Level and secure to posts |
| Joist Installation | Space evenly, guarantee alignment |
Once the posts are set and the concrete has cured, you’ll attach horizontal beams along the top. These beams must be perfectly level as they form the primary support structure for your joists. Speaking of joists, they are critical for distributing weight evenly. Guarantee they are spaced properly and aligned precisely to prevent future warping or uneven wear.
Installing Decking
Now that the framework of your deck is securely in place, it’s time to install the decking boards—the visible surface that will define the look and feel of your outdoor space. Start by selecting high-quality, durable materials suited for your climate. Safety is paramount, so make certain each board is free of defects like large knots or splits.
You’ll need to lay the boards perpendicular to the joists for ideal support. Begin at one end of the deck, spacing the boards about 1/8 inch apart for wood or according to manufacturer recommendations for composite materials. This spacing is essential as it allows for wood expansion and water drainage, preventing potential hazards like slippery surfaces or structural damage.
Secure each board with decking screws directly into the joists. It’s safer to use screws rather than nails, as screws provide a more secure hold, reducing the risk of loose boards. Always pre-drill holes to prevent wood from splitting.
Remember to check each board for alignment and level as you go. A consistent approach not only guarantees a safer deck but also enhances its aesthetic appeal. Once all boards are installed, you’ll have a stable and stylish foundation ready for use.
Adding Features
As your deck takes shape, consider enhancing its functionality and style by adding features such as built-in seating, lighting, or planters. Built-in seating not only maximizes space but also guarantees stability and safety, reducing the clutter of loose chairs. Opt for seating with backrests for added comfort and security, especially if you have children or elderly guests.
Incorporating lighting can extend the usability of your deck into the evening. Choose LED fixtures for their durability and energy efficiency. Install lights along staircases and around the deck’s perimeter to prevent trips and falls. This feature not only improves safety but also adds a warm ambiance that makes your outdoor space inviting.
Adding planters brings a touch of nature to your deck, creating a more relaxing environment. Use sturdy, non-slip materials and secure planters firmly to the deck structure. This prevents tipping and makes maintenance easier while guaranteeing they’re safe for everyone to enjoy.
These features, when thoughtfully integrated, not only enhance the beauty and functionality of your deck but also prioritize the safety and comfort of everyone who uses it. So, take the time to plan these additions carefully to achieve both aesthetics and practicality.
Maintenance and Care
To guarantee your deck remains in top condition, regular maintenance is essential. You’ve invested time and money into building a beautiful outdoor space, and now it’s vital to protect that investment. Regular cleaning and periodic treatments will prevent damage and keep your deck safe and appealing for years to come.
Here’s a simple maintenance schedule to help you stay on track:
| Frequency | Task | Importance |
|---|---|---|
| Monthly | Sweep and clear debris | Prevents buildup |
| Biannually | Deep clean and inspect | Identifies issues |
| Every 2-3 years | Seal or stain | Extends lifespan |
Firstly, sweeping your deck monthly removes debris that can trap moisture, leading to rot or mold. It’s a quick task that makes a big difference.
Every six months, give your deck a deeper clean and conduct a thorough inspection. Look for loose nails, splintered wood, or signs of wear and tear. Address these issues promptly to guarantee your deck remains safe and functional.
Every two to three years, apply a sealant or stain to protect the wood from UV rays and moisture. This not only enhances its appearance but also adds a layer of safety by reducing the risk of slips and falls. Stick to this plan, and you’ll enjoy a sturdy, beautiful deck for many seasons.